
Disclosure: As an Amazon Associate, I earn from qualifying purchases. Learn more
Last Updated on December 27, 2023 by Mark Jase
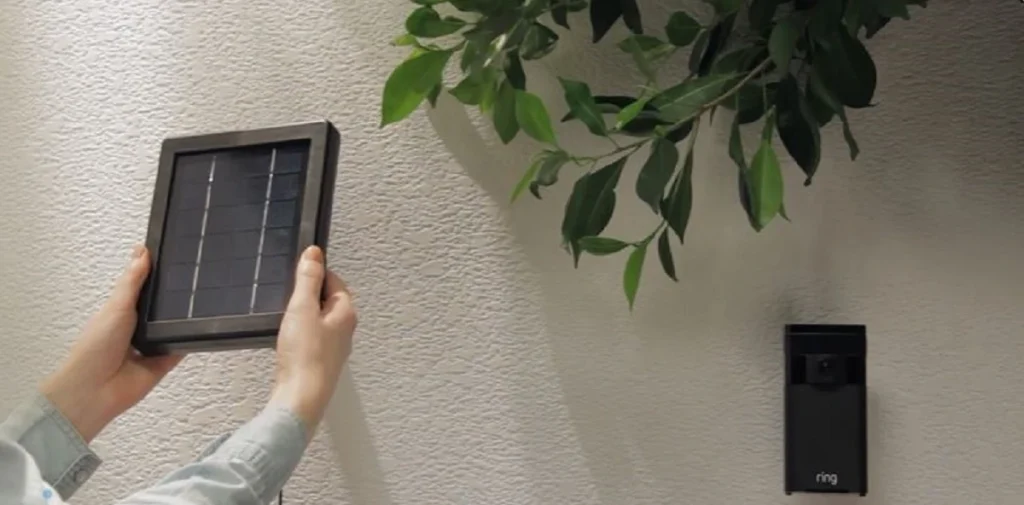
Installing a Ring solar panel requires understanding its placement, mounting, and connection to your Ring device. The key is to ensure maximum sunlight exposure, typically achieved by using the adjustable mounting bracket included with the panel. For optimal results, mount the panel high up.
When installing a solar panel for the Ring Stick Up Cam, the process involves securing the panel in a sunny location and connecting it to the camera.
The Ring solar panel comes with instructions that guide you through mounting the panel and routing the cable to the camera. The key is to find a spot with maximum sunlight exposure for the majority of the day.
For Ring doorbells, such as the Doorbell 2 or Doorbell 3, the installation process is similar but tailored to the doorbell’s design. The Ring solar charger, specifically for these models, needs to be mounted near the doorbell. It’s crucial to ensure the solar charger is exposed to sufficient sunlight, which powers the doorbell battery.
The Ring solar panel mount is designed to be versatile and can be installed on various surfaces, including roofs. When installing on a roof, safety and securing the mount properly are paramount.
The solar panel should be angled to capture maximum sunlight, and the cable should be routed securely to avoid exposure to the elements.
The Ring solar panel setup is straightforward, with detailed instructions provided in the manual. It’s important to follow these instructions carefully to ensure the panel is installed correctly and safely.
Setting up the solar panel involves mounting it, connecting the cables to your Ring device, and ensuring it’s receiving enough sunlight to function effectively.
Read More: Can You Put Solar Panels on a Townhouse?
How to Install Ring Solar Panel?
To install a Ring solar panel properly, certain tools and materials are needed. These include a drill, screws (usually provided with the panel), a screwdriver, and possibly a ladder for reaching higher installation points. The process involves several steps to ensure that the panel is installed securely and positioned optimally for sunlight exposure.
Step 1: Identify Optimal Sunlight Exposure
Before mounting the solar panel, identify a location where it will receive maximum sunlight. This is usually a south-facing spot on your property. Avoid areas with shade from trees, buildings, or other obstructions.
Step 2: Mounting the Solar Panel
Most Ring solar panels come with an adjustable mounting bracket. Attach this bracket to the back of the panel. Then, hold the panel against your chosen surface, mark the drill points, and drill holes for the screws. Secure the panel to the surface using the screws. Ensure the mount allows for angle adjustment to optimize sunlight exposure.
Step 3: Connecting to Your Ring Device
After mounting the panel, route the cable to your Ring device. This might be a doorbell or security camera. Plug the cable into the device, ensuring the connection is tight and secure.
Step 4: Angle Adjustment for Maximum Efficiency
Adjust the angle of the solar panel to capture the most sunlight. The ideal angle varies depending on your geographic location and the time of year. Generally, a tilt of about 30 to 45 degrees is effective in most regions.
Step 5: Secure the Wiring
Ensure the wiring between the solar panel and your Ring device is secured and protected from environmental elements. Use clips or ties to attach the wire along a secure path to prevent damage.
Step 6: Test the Setup
Check the Ring app to confirm that the solar panel is charging your device. If the panel is installed correctly, you should see a change in the power status in the device settings.
Learn More: Do Solar Shades Block Heat? How?
Queries on Ring Solar Panel Instructions
Can I Install the Ring Solar Panel Myself?
Yes, you can install the Ring solar panel yourself. The process is designed for DIY installation. It involves selecting a sunny location, mounting the panel using the provided bracket, and connecting it to your Ring device. Basic tools like a drill and screwdriver are usually sufficient for the installation.
What Tools Do I Need for Installation?
The primary tools needed for installing a Ring solar panel are a drill, screwdriver, and possibly a ladder. The drill is used for mounting the bracket, while the screwdriver is needed for securing the panel to the bracket. A ladder may be necessary if the installation is at a height.
Is It Necessary to Adjust the Panel Angle?
Adjusting the angle of the Ring solar panel can optimize its sunlight exposure. The panel should be angled to face direct sunlight for the majority of the day. This position enhances its efficiency in charging your Ring device.
How Do I Maintain the Solar Panel?
Maintaining the Ring solar panel involves regular cleaning to remove dust or debris and checking the connections. Clean the panel surface gently with a non-abrasive cloth. Also, ensure that the cable connections are tight and secure to maintain a consistent power supply.